
|
|
|
|
|
|
|
|
|
|
|
|
|
|
|
|
|
|
|
|
|
|
|
|
|
|
|
|
|
|
|
General Education...... What time is it?
To make a teaching clock
You will need
- Stiff card
- Glue
- Sticky tape
- A split pin
- A bead (large enough to push the split pin through)
- Sticky back Velcro (hook and loop fastener)
- Clear sticky back plastic
- Print outs of (Images printed directly from
the browser will be quite small. To get a larger image right click picture
and save image then import the image into your word processing package
e.g. Word and enlarge the image there.)
Either print the diagrams out directly from the browser or download the zipped Microsoft Office 2000 Publisher file from our downloads page and print out from Publisher.
Instructions
- Stick the clock face onto a piece of card. Be sure to leave space beneath the clock face to attach the sticky Velcro bar.
- Cover the clock face with clear sticky back plastic. (or better still laminate it)
- Carefully make a hole through the centre dot.
- Stick a strip of the 'soft' side of the sticky back Velcro under the clock face. This should be long enough to hold all 12 number circles. ( see the diagram clock 1)
- Stick small pieces of the 'soft' side of the sticky back Velcro into the centre of each of the circles around the edge of the clock face.
- Stick the number circles onto stiff card and cut them out.
- On the back of each number circle stick a small piece of the 'hooky' side of the sticky back Velcro.
- Stick the clock hands onto stiff card and cut out. (there is a choice of clock hand colours on diagram 3 )
- Punch holes in the centre circles of the clock hands
- Use a split pin to attach the hands to the clock face, placing a small
bead between the hands and the clock face to raise the clock hands above
the clocks surface.
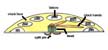
Select the picture to see a larger view - Use tape to stick a square of card onto the back of the clock to cover the split pin arms.
- You should now be able to stick all the number circles onto the Velcro bar ready for your child to move them to the correct positions on the clock face. Then practice telling the time.
| Teaching Clock Introduction | Use Clock | Make Clock |
![]()
Derby web and ecommerce design - veedesign
©2011 V Jones